

Hi Everybody, I hope you have all had an excellent Christmas and New Years!
I’ve been busy keeping to my new years resolutions to lose weight and make more from my art scraps. So far, I’ve lost 7Ibs (thank you Glucose Goddess!) and now, I’d also like to share some ways in which I’ve been recycling my art scraps and giving them a new life. Hopefully, this will help some of you get extra use from any wool or yarn off cuts and threads as well (and possibly some plastic, paper, card and metal recycling in the next few blog updates). It might even inspire you to create projects that haven’t been mentioned below, if that’s the case please share it in the comments and help everybody get those creative juices flowing!
Just a quick reminder that these blogs are created solely by me and I do not charge you to subscribe, so if you’d like some creative tips like these going directly to your inbox each month – just hit the subscribe button. I literally do this for the love of all thing art, and I want more people to get involved in arts and crafts.
Anywho, on to the good stuff…
Contents
First, here is a list of the scrap items and outcomes, so you don’t have to doom scroll to find what you’re looking for:
- Wool/ Yarn off cuts
- Creating batts with either a blend of roving and your scrap wool or just your scrap wool/ yarn
- This can be taken further by spinning it into a new ball of wool
- Used as trapping embroidery
- Small weaves and rag rugs
- Pom poms
- Stuffing crocheted, knitted or sewn projects
- Wool Glitter
- This can be taken further by using it to make new paper with or textures in mixed media (see more about paper in my upcoming blog posts)
- Creating batts with either a blend of roving and your scrap wool or just your scrap wool/ yarn
- Threads
- Creating batts with roving
- Fringes
- This can be taken further by creating tinsel or edging for art and costumes
- Pom poms and tassels
- Stuffing sewn projects
- Dolls hair
1. Wool / Yarn Cut offs
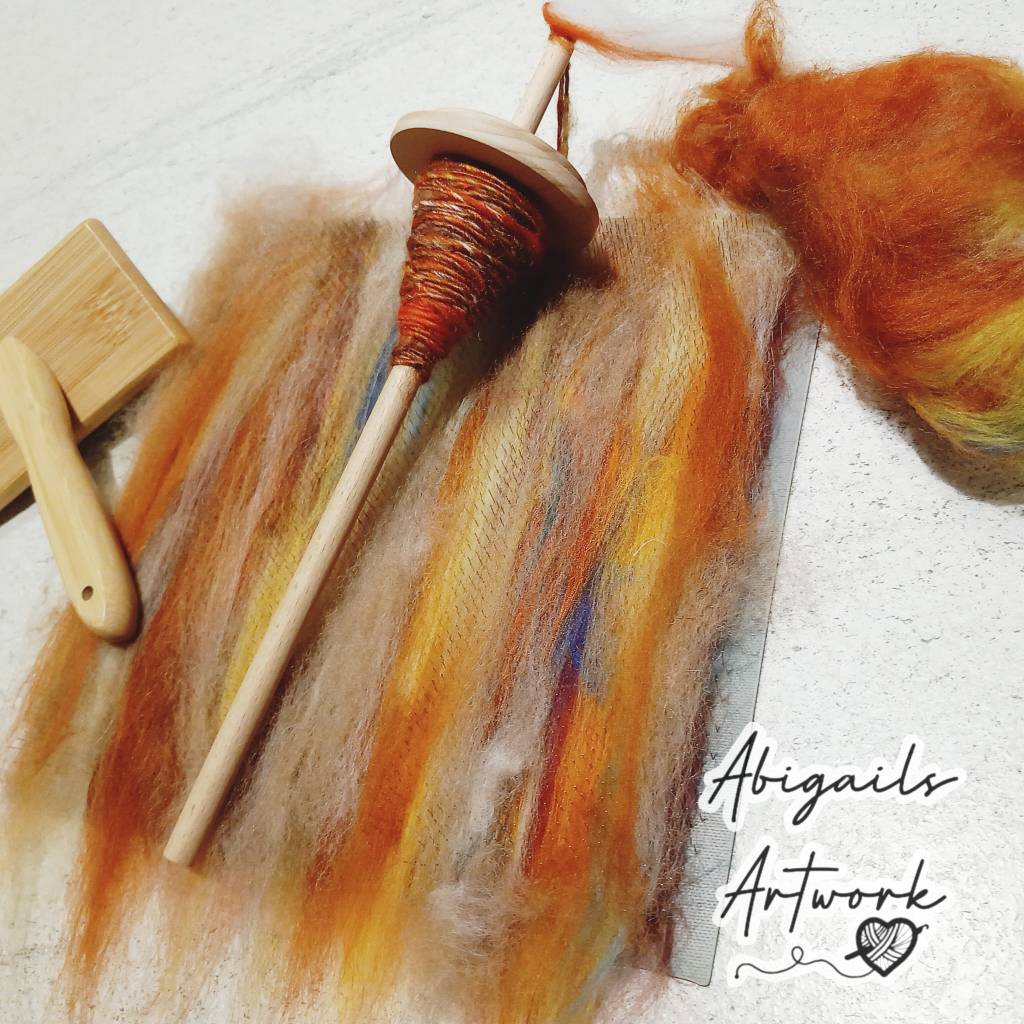
a. Creating Batts
What is a wool batt? It’s essentially a bundle of fibers that have been brushed to lay all the same direction to make it neater and easier to spin into new yarn etc, the process of doing this also gives us an opportunity to create different shades and textures. Creating batts with wool cut offs is an easy way to use up even the smallest of wool fibers. All you will need is:
- A pair of carders (they are like big flat dog brushes)
- A blending board (its like a mat with loads of bent metal teeth that stick up)
- Wool scraps
- Roving (optional)
There are plenty of online tutorials that you can access for free on how to create batts (YouTube is a great source), but the gist is you’re aiming to get all the individual fibers laying in the same direction as each other as opposed to twisted or tangled. Think of it like combing your hair straight to untangle it.
To do this, pass a small amount of roving/ scrap wool between the carders being careful to only pick up the fibers and not crunch the teeth against each other. Repeat the process until you have small pieces of carded wool/ roving. You can then start using a blending board, drag the fibers along the surface so they catch and at this stage you can sprinkle on some pieces of scrap wool if you’d like. I like to call this wool glitter… It’s pretty, but my oh my does it get EVERYWHERE.
Add more of your carded roving/ scrap wool over the wool glitter layer, dragging it along the surface of the blending board. To remove the batt, gently pull the edge of the fibers on the bottom up and away from you. At this point I like to use a pencil or wooden dowel to loosely roll the fibers away from me, this helps wrap the fibers into a cylindrical tube that is easier to handle for me but you do not need to have anything if you prefer. The end result once the fibers are off of the board and any utensils, should look like a smooth cylindrical cloud. This can then be used for spinning into new yarn, needle felting or wet felting as well as lots of other uses.


b. Trapping Embroidery
I did touch on this in one of my last blog posts so I will link it here.
Trapping is using a needle and thread to hold down whatever object you’re wanting to attach to your embroidery work with stitches.
Wool it a fantastic thing to use with this method because it gives texture and variety to artwork.
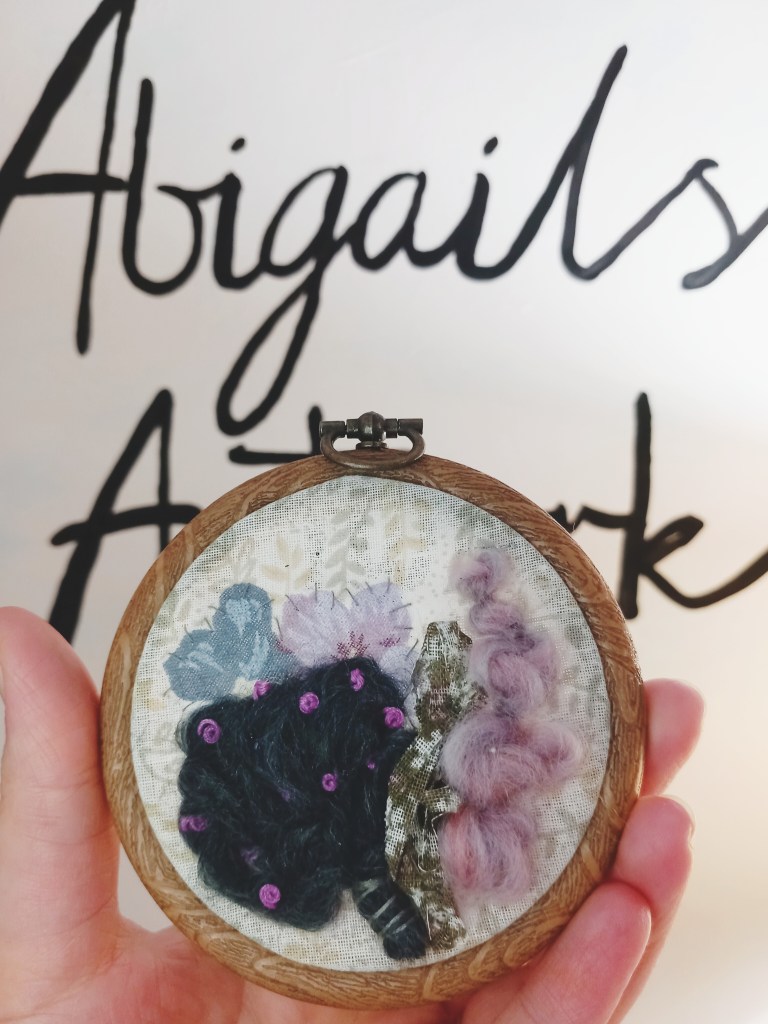
base of an abstract bouquet.

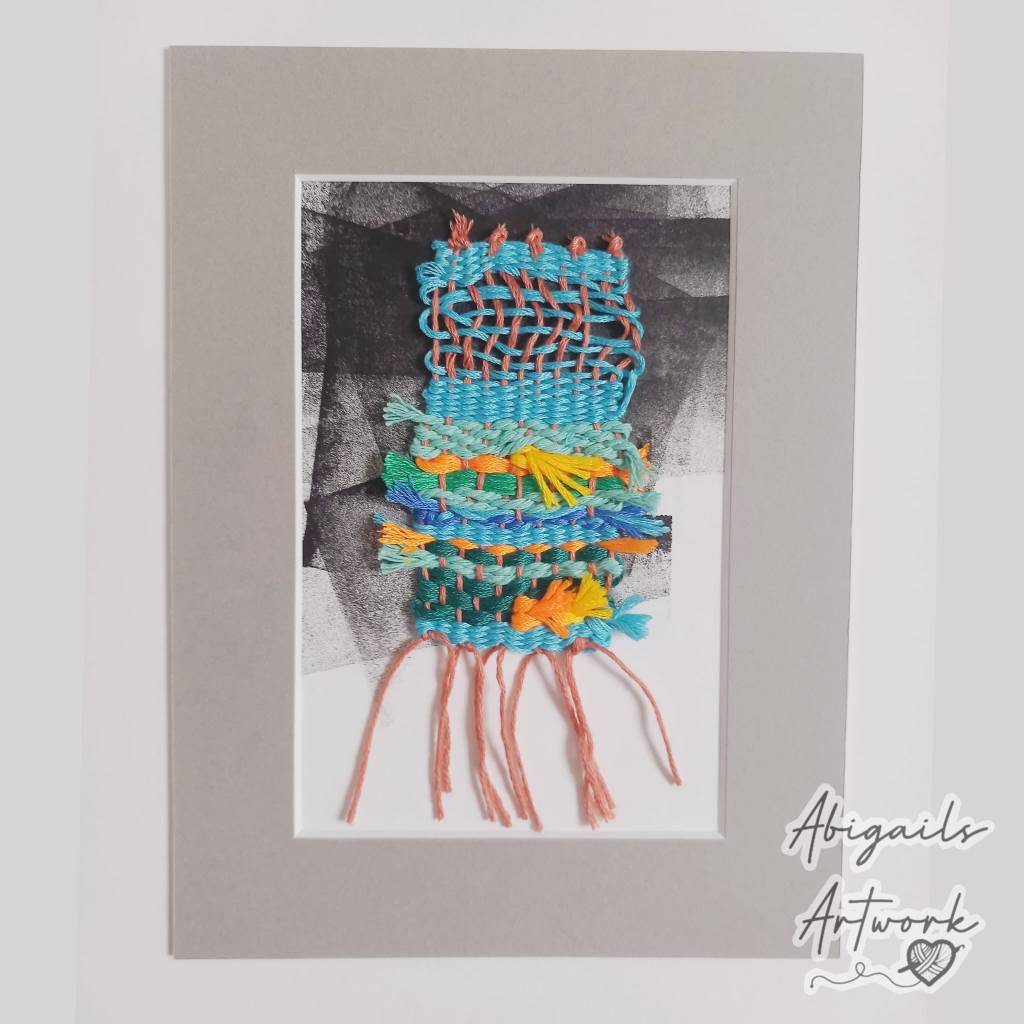
c. Small Weaves and Rag Rugs
You may need slightly longer scraps to try these ones, unless you have very tiny hands and never ending patience.
1.For small weaves, I use a longer warp string and use the wool scraps and thread scraps as the weft to give stability. I have a few examples on my Etsy store here and some in my gallery here.
You will need:
- Wool scraps
- A long piece of string
- Card
- Scissors
Start by cutting your card about 1 cm bigger than you’d like the final weave to be. Next, make small 0.5 cm snips into the card along the top and bottom at regular intervals (This will be where your warp string sits). Then, make a knot in your long warp string to anchor it in the first slot and start wrapping in around the card top to bottom using the slots you’ve made, one wrap per slot. Finish by either tying a knot in the last slot to secure it or taping it down on the back. I find taping it is usually more secure. Now, use your scrap wool to weave your weft pieces in and out of the warp. Lastly, once you’ve completed your weft, snip the strings along the back of the card and remove the card gently before tying the warp ends off.
I recommend looking on YouTube for a video version if you have never done any weaving prior.

2.For rag rugs, you will need a large collection of scrap wool pieces that all measure about 8 cm roughly. Basically you want to have enough for either tying a knot/ crochet loop whilst having the remaining tails as long as you need for the depth on the rug pile you’re aiming for. Its also a LOT easier to do this project with the ready made rag rug backs you can pick up at most craft stores. Some crafters like to use cross stitch material too. When the rug starts to take shape, I also find having a crochet needle on hand is helpful for hooking the wool through the material.
Its quite intuitive and it’s something that can be done whilst watching television.
d. Pom Poms
Ah, pom poms! what’s not to love about them?! This will need longer lengths of yarn again but if you have the small pom pom/ tassel tools then you can get away using shorter pieces. I would highly recommend getting a cheap and cheerful set of pom pom makers that come in different sizes especially if you’re making these with just leftover yarns, because at least the sizing with be exact on each one which will give your projects some continuity.


e. Stuffing
This is probably one of the most common ways to use up your stash of wool scraps, its easy and efficient and empties your stash basket as quickly as possible…Stuffing!
Its basically what it says on the tin, there’s a few tips that might help you though;
- If you’re stuffing crochet or knitted items, either make sure the holes between your stitches are tiny or that you have a “holder” for you’re stuffing (*non recyclable plastic bags have entered the chat*) so you don’t have worms of scrap threads and wool creeping their way out of your pretty projects.
- Use a wooden dowel or handle of a mixing spoon to shove the scraps in, if you’re stuffing, it should be stuffed.
- Remember that wool felts, so if you’re planning on washing your project and don’t want hard balls of felted stuffing this isn’t the option for you!
f. Wool Glitter
I touched on this earlier when talking about batts. Wool glitter is a term I have coined from cutting up yarn scraps into tiny pieces… the colours are pretty just like glitter, but I don’t recommend doing it without a vacuum nearby, Just. Like. Glitter.
“Why would you cut up small yarn pieces that you’re struggling to use into even smaller yarn pieces?” I hear you ask. Well, sometimes it comes in very useful for adding texture to textile pieces. Imagine you want to create a moss covered ground scape on your background but you don’t want to embroider every last stitch because the area is humongous.. the answer is Wool Glitter. Simply chop up some of your leftover browns and greens. Apply fabric glue or PVA to your background, grab a handful of wool glitter and get squishing it on there. The key is to avoid getting glue on your hands and don’t shake of the extra until its dry. You can layer this up, you can embroider and embellish over it and its like a little fluffy patch of happiness.
Also you can use it in batts, inside clear Christmas ornaments and add small amounts when making paper.
2. Threads
a. Creating batts with roving
This is exactly the same as the wool/yarn version except you MUST use roving or some form of wool/ yarn fiber with this as a base.
Follow the same steps as above with creating a batt, but instead of sprinkling wool, sprinkle your threads in. You can get some really interesting outcomes especially when you use you batt for spinning art yarns like the images below.


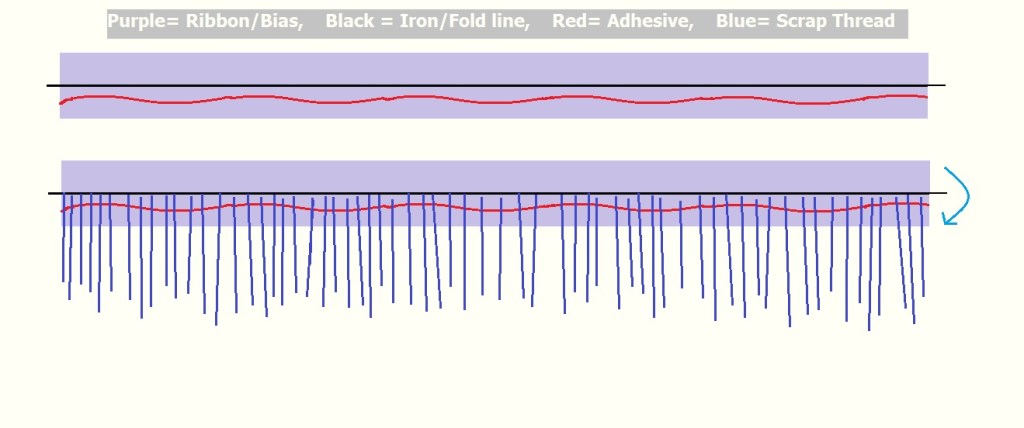
b. Fringes
This is a great one for using up threads that are a bit short and would usually get stuffed in other projects. You’ve paid your hard earned monies for this thread, don’t hide it inside as stuffing if you can use it as something beautiful instead!
There are a few ways you can achieve this but the easiest way uses these items (you can find what works for you best, especially if your item will need to be washed):
- Scrap Threads
- A length of wide ribbon or bias
- Iron with a damp towel. Be careful when using hot appliances, children should be supervised by a responsible adult.
- Fabric glue or double sided tape
- Sewing machine or needle
- Bulldog clips, pegs or fabric clips (not pins)
- Thread that matches your ribbon or bias (optional)
Firstly, start by laying out your ribbon or bias and make sure you can double it over on itself the entire length down along the ribbon/ bias. Iron it like that on a low to medium heat, you may need to use a damp towel so the iron doesn’t stick to the material. Again, be careful using hot appliances and children should be supervised by a responsible adult. Once you have finished with the iron, you will see your ribbon or bias will now have a crease where the threads will butt up against. This is where on one side of the inside of the creased ribbon/ bias you will now either put a small thin line of fabric glue or double sided tape. If you choose to use a glue, do a test spot first to see if you particular ribbon or bias lets it bleed through. I tend to use double sided tape for this reason and also it gives me more time to place the threads neatly. Next, you guessed it, place the threads evenly along the adhesive, butting them up to the crease. Once you have done that, fold over the top of the ribbon/ bias and either clamp with your clips to dry if using glue or sew along the length of ribbon/bias if using tape to make sure it’s secure. Lastly, trim the edge of the fringe to neaten in. This is easier if you use the edge of the table as a guide.
There are also similar ways to make tinsel with your wool scraps and threads, I came across this one here from Jelly & Pickle which is a fab little tutorial. Ellie uses new yarn but this can easily be swapped for scraps of wool and thread with a little patience and time. You can even cut the cardboard template thinner to make a “Thinsel”.
c. Pom Poms
Just like the wool scraps above but with Threads. You might even want to mix and match threads and yarn, but just make sure your finishing knot is tight so you don’t have any escapees!
d. Stuffing
Again this is just like the wool scraps version, just make sure you definitely have something that contains the threads so they don’t escape.
e. Dolls Hair
A lot of the projects and upcycles I talk about can be down sized for doll houses and miniatures, so why not add some luscious locks to your little dolls too. this one is a simple one and only requires either PVA or a hot glue gun and some steady hands with a touch of patience. Just make sure that you glue the hair around the hairline first, and leave the top of the head for last, also you don’t need hair on the entire head unless you want it to be super thick. Instead glue it like tree rings until you get to the very top where you can create a parting.
Tell me about your creations
If you got this far, thank you! Recycling is not just great for the environment, but these tips could actually save you hard earned money that you’ve already spent on beautiful wool, yarns and threads. I’d love to hear about your creations with leftover scraps so leave a comment below.
Are there any other fabulous uses you have for your scraps and what would you like to hear about next?
Also, if you’d like to see these blog posts as emails straight to your inbox, just subscribe, it’s absolutely free and I type all of this at my very old laptop in my limited spare time – I just want to motivate people to create beautiful things!
Enjoy the rest of your January and I’ll see you with the next blog post.
Abigail x

Leave a comment