

Crafting Time: Approximately 20 minutes, varying based on the complexity of the design.
Hello again everybody, Merry Christmas!
I hope you’ve all been happily crafting away ready for the Christmas holidays? And if not, then maybe this one will spark a little bit of inspiration…
‘Using Metal in Textiles‘
I feel like this is a great way to add some sparkle to your art and can take it to the next level. Plus, it’s a fabulous holiday craft and can even be used for baubles on your tree! So lets dive in, get your festive spirit on and round up these bits and bobs from your supplies:
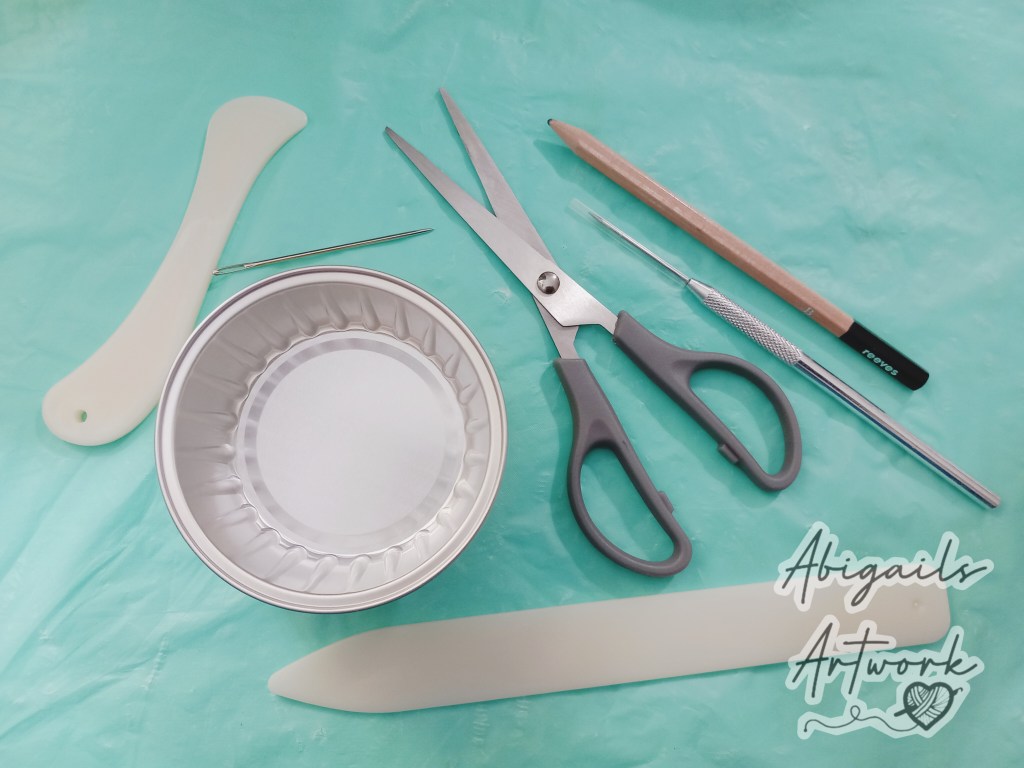
- Thin metal
- Scissors for cutting to shape
- Tool for punching holes: awl, hole punch, thick needle, or pointed clay tool
- Pencil
- Tool to flatten metal: a paper folding tool, plastic ruler edge, or clay shaping tools, back of spoon.
- Embroidery cotton to attach to your work, or ribbon for hanging by themselves
- Safety Gloves
Safety First!
This project will involve sharp edges, so be very vigilant where your fingers are and wear gloves if you’re the clumsy type!
We want to finish this project with all our fingers and without an organically stained red metal design!
You can definitely involve children in making this craft although, I would make sure:
- An adult does the metal cutting
- Folding over the edges before drawing the designs to avoid finger cuts
- Read ahead and make sure this craft is suitable first
1. Finding the Right Metal
Before you start, you need to find the right type of metal for this project. Too thin and it will rip, too thick and it won’t mark. Aluminium works an absolute treat, but the possibilities are endless.
The best types I have found are;
- Aluminium disposable trays. They’re fairly inexpensive and usually don’t need lots of flattening before you start your design. They can be washed after food use for you to use in this project too. They also come in different colours, typically silver or gold, which makes it super handy to match your colour pallet.
- Soft drink cans. These take a little more work and usually are silver in colour. Depending on the can thickness, you might need gloves and tin snips to open it up. Scissors will usually suffice though. The simplest method is to pierce a hole at the neck of the can. Then, make another hole near the base before the curve. Finally, cut off the top and bottom. It will leave you with a ring of metal that you can cut near the seam and flatten out. Remember to wash this too. Otherwise, you will have a lingering smell, sticky residue, and ants in your house!
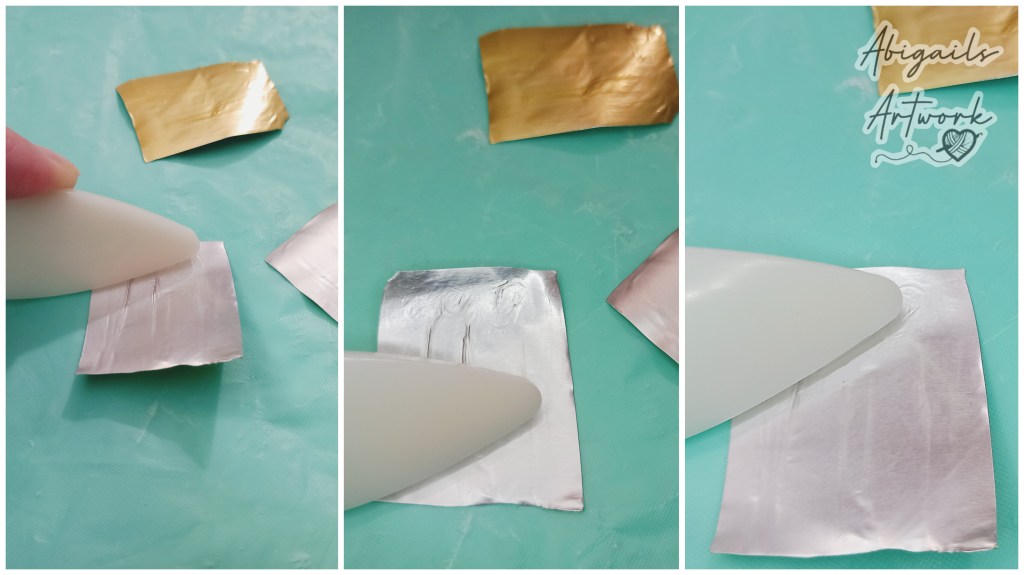
- Tomato Paste Tube. These metal tubes are usually a warm gold colour inside. They are a nice reusable surprise after all the yummy meals they have contributed to. They will take a fair bit of cleaning to make sure the tomato-y smell doesn’t linger. The metal is really pliable, snip it with your scissors near the bottom & top. (I recommend to do this over a sink before opening it up and washing it!)
Thickness
There will be plenty of suitable alternatives but hopefully these will give you an idea of thickness. I wouldn’t go much thicker than a drinks can. Otherwise, you will find it really difficult to do any mark making. And, I wouldn’t go much thinner than a disposable foil tray (you know those really thin cheaper ones!) Because if you do too much mark making in an area it will start to split. Metal like aluminum baking foil won’t hold up to a pencil drawing along its surface. I would only try with that if you have unrelenting patience, or you aren’t worried about preserving it.

2. Flattening your Metal
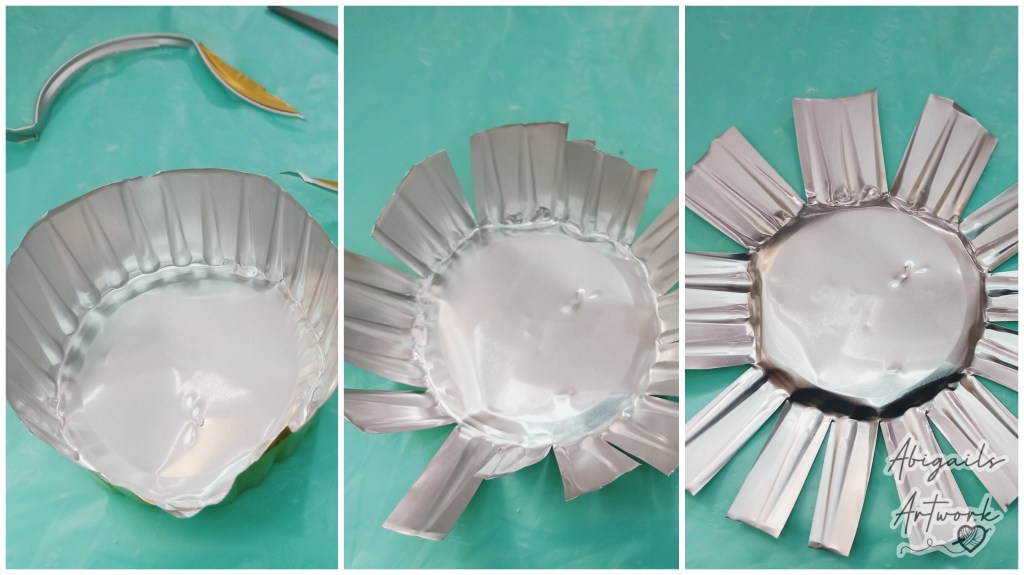
Hand Flattening
Now that you have found a suitable piece of metal, make sure it is flat. If it’s already flat, you can move onto the next step ‘Smoothing’.
All you clumsy ones, put your safety gloves on for this bit!
- Food Containers – If you have a container like me, cut off any thick rims before cutting a ‘starburst’ of lines towards the centre circle so it can be hand pressed flat (see photos below). You can make use of all the pieces except the rim.
- Cans – The simplest method is to pierce a hole at the neck of the can. Then, make another hole near the base of the side wall. Finally, using the holes to get you started, cut off the thick top and bottom. It will leave you with a ring of usable metal that you can cut near the seam and flatten out. Make sure you clean this with warm soapy water before smoothing and drawing.
- Tubes- snip off the top and bottom thick parts with scissors over a sink. Cut along the seam to open it up. Wash out any remaining contents and clean with warm soapy water before smoothing and drawing.
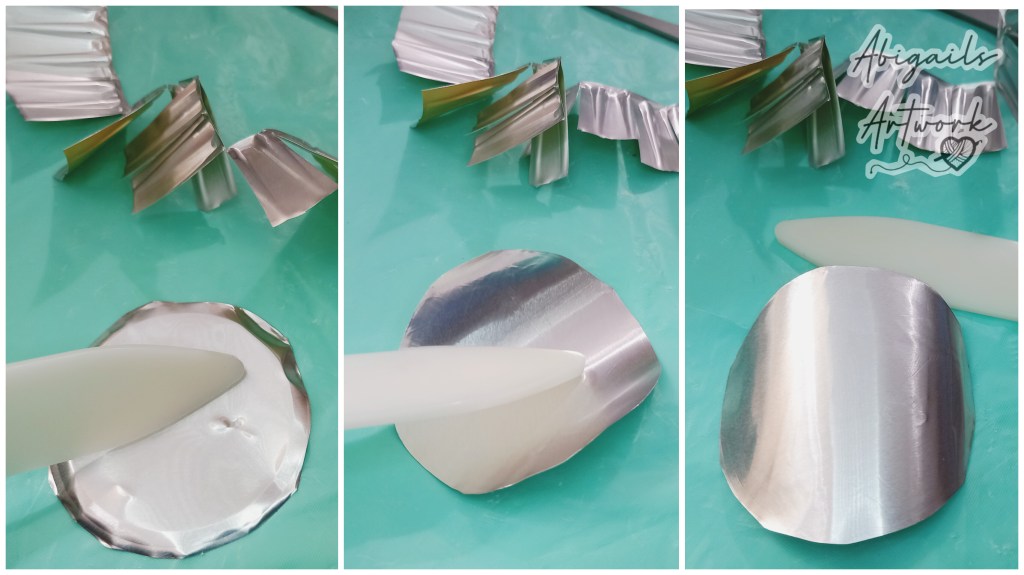
Smoothing
To smooth out the metal I like to use a resin tool that’s typically made for folding paper sharply. A strong ruler could also work. Alternatively, you might prefer the back of a spoon if you’re struggling to find something that works for you.
Use the tool by swiping it across the surface of the metal. Aim to smooth any wrinkles and creases. There are different tools you could use for this. You might want to practice with different techniques. But, what works for me is to swipe outwards from the centre of the metal on rounded shapes or from one end to the other on squared shapes.

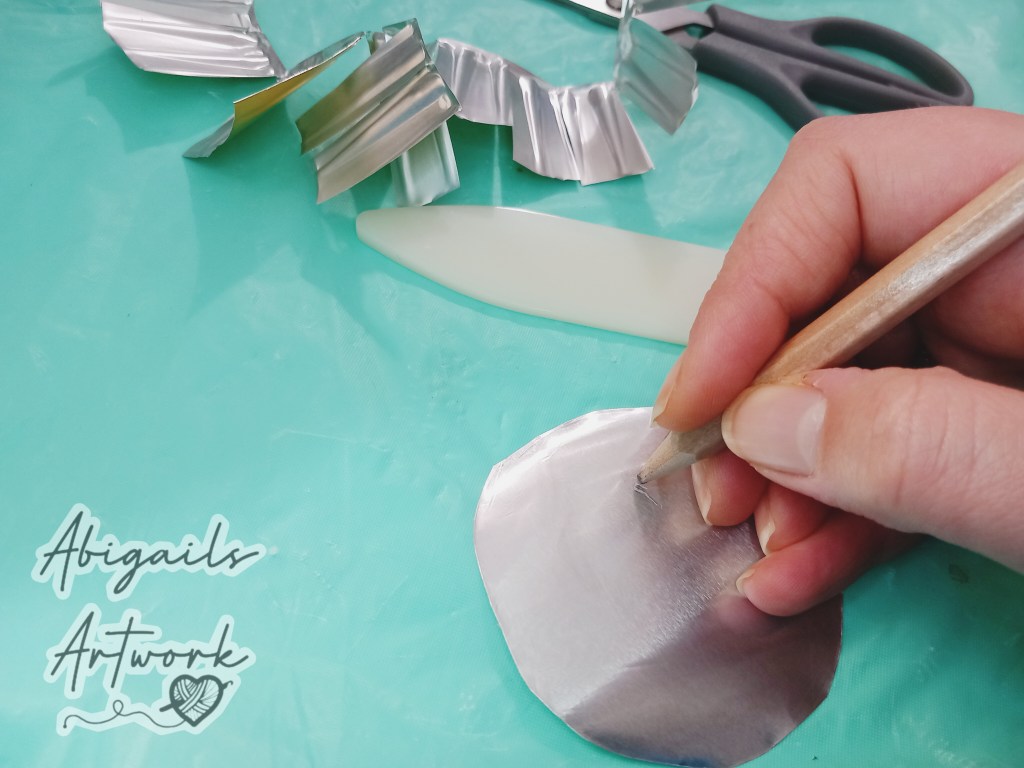
3. Mark Making on the Metal
Wahay! You made it this far so now comes the really fun bit. Designing and Mark making! If you’re not so confident, you can sketch up some ideas on paper first. Still, I like to delve straight into marking the metal.
Grab your pencil and draw your design on the surface of the metal.
Which Side to Draw On
The side you choose to draw on, front or back, determines the texture of your final piece. Marks on the metal will be raised or pitted. If you draw on the back remember to reverse your design, especially any writing. Marking the back will result in raised marks on the front of the piece. If you draw on the front, you can keep your design the correct way. Your pencil will create valleys where it has pressed.
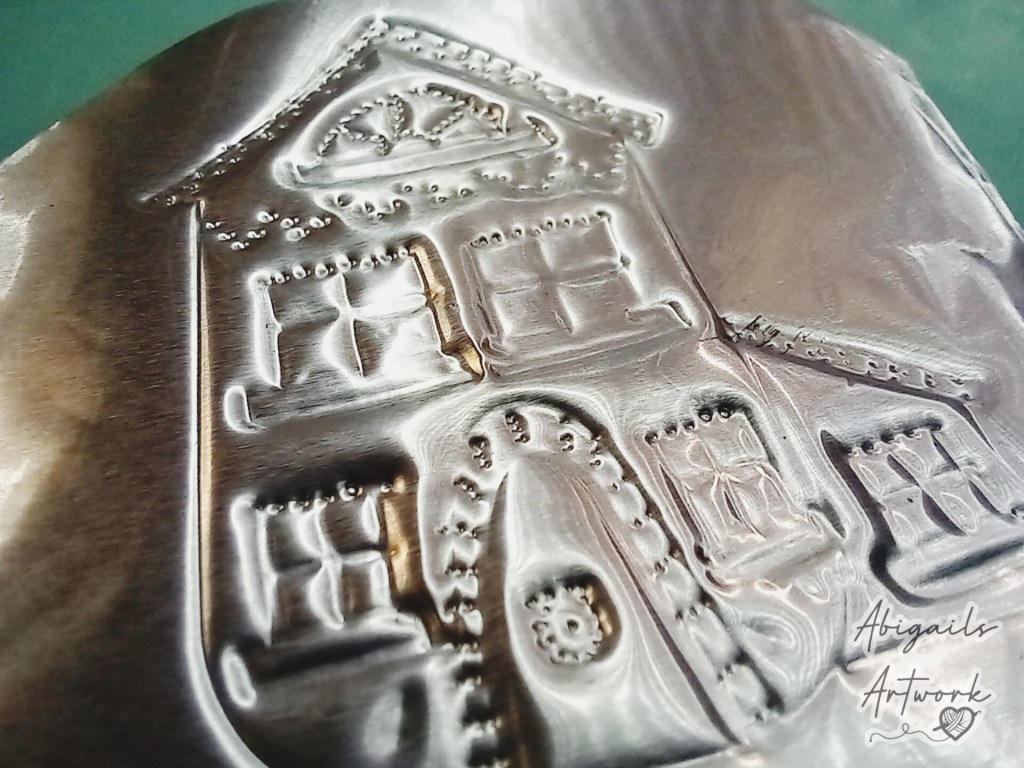
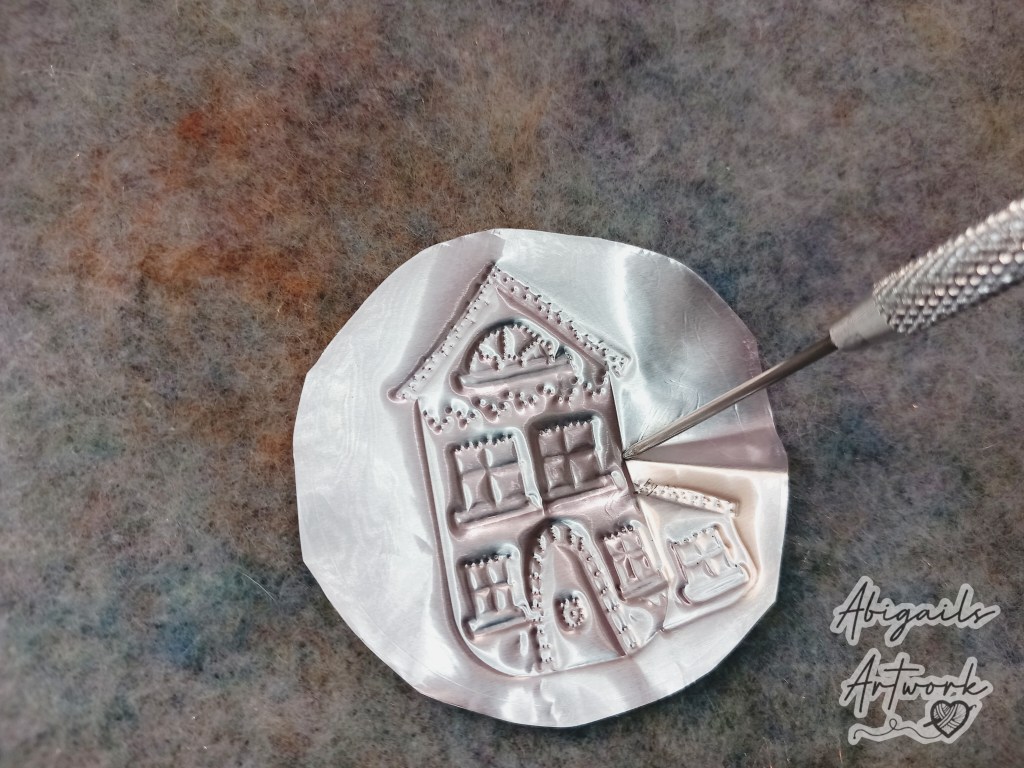
Experiment
Once you’ve got the hang of this, you can start experimenting with different tools to make marks. Some of my favourites are clay making tools. You can also use things like metal stamping letters with a small hammer. You only need to tap gently and make sure your workspace is appropriate! You can also use things like needles and hole punches to create hole in your design. I like using my clay poke tool to pierce holes and make tiny indents to give different textures. There’s so much more you can do when it comes to scratching the surface of the metal too.
I won’t get into acid etches and blow torches in this blog just yet. Not everybody has access to these (including me right now!) Still, these can give some stunning effects, especially heat treating thin slivers of copper. That can make some beautiful colours and is worth trying if you do have the equipment.

4. Finishing your Metal Piece
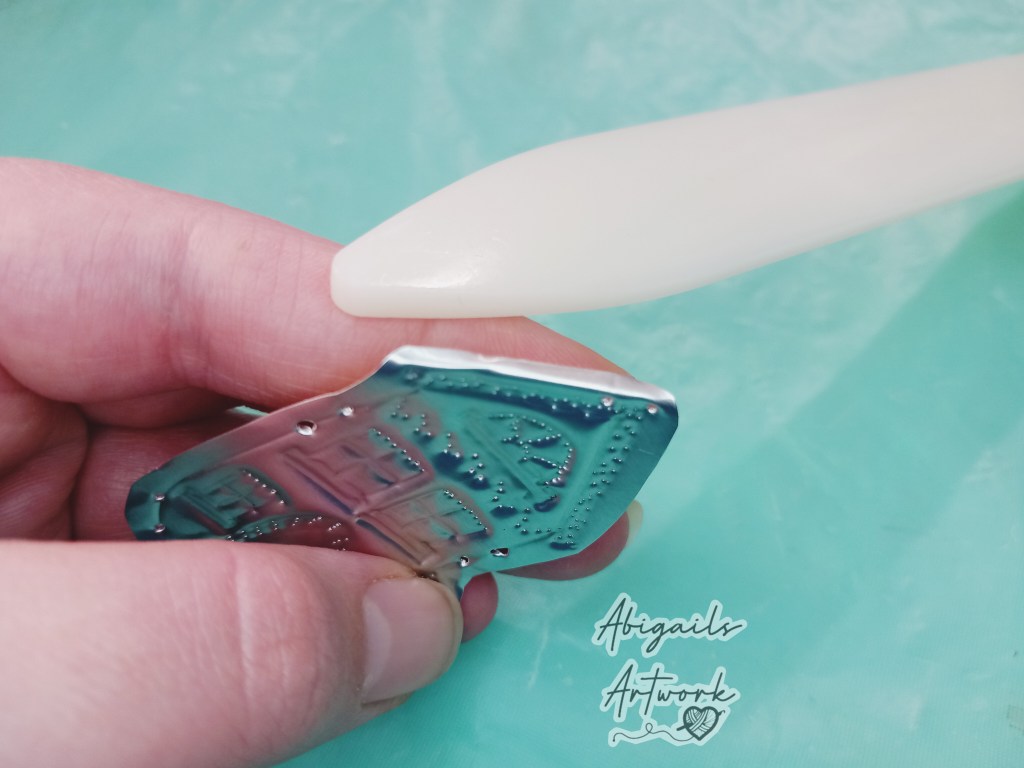
- Cut around your design, unless you want to leave it as is for your design style, using scissors and taking care to not slice you fingers with any sharp edges. If you are planning on folding over the edges, remember to leave a small margin around your design to fold.
- It’s not absolutely necessary, but I prefer to fold over the metal edges using my paper folding tool to avoid any nasty finger cuts.
If you’re using this technique to make Christmas decorations I’d highly recommend folding the sharp edges over. Even more so if you have young children nearby. See the Safety First section at the beginning of the blog.
- Lastly, you’re going to need to poke holes in it to either attach it to your art or hang it. I use the clay poke tool but you can use a needle or hole punch. Side note, if you are attaching this to textiles then use a good strong embroidery thread. It will avoid snapping thread on any sharp edges whilst it’s sown in place.


Where Can I Use This Craft?
If you’re wanting some inspiration on where you can use this craft, here’s a few ideas:
- Textiles and Mixed Media Art
- Christmas Tree Decorations
- Costumes and Cosplay
- Homemade Sequins
- Bunting
- Garden Hanging Decorations
- Badges
- Hanging Sun Catcher
And That’s all There is to it!
I hope you all have a fabulously joyful Christmas and a Happy New Year. Fingers crossed this little guide has helped expand your craft or spark some inspiration for you.
Enjoy yourselves, and please comment below with your creations and what worked best for you. Also, don’t be shy to add what you explored in this craft or what you changed, I would love to see all your art creations.
Don’t forget to like and share my blog to get more people making, reusing, and recycling.
Abigail xo

Leave a reply to Creative Recycling Ideas Part Two: Paper, Plastic and Metals – AbigailsArtwork Cancel reply